Today I'm laboring to make two matching Bandana Rag Quilts. One will be twin size and the other will be full size. I am constructing them now.
They will be ready by the end of the week...Hopefully.
Monday, September 1, 2014
Tuesday, August 19, 2014
Just finished
I love this fabric! Wee Wander by Sarahjane for Michael Miller. I made my grand- daughter her birthday dress for her second birthday with it.
I always want to try a rag quilt with beautiful fabric so I got more and made this quilt:
My idea was to make it seem like midday to twilight where the colors gradually get darker until the big panel with children catching lightning bugs. (You can't see them in this picture but I sewed lines from the ragged seams all the way down and a line across the panel lengthwise.)
My plan is to make one more quilt with this fabric, a smooth quilt with small squares.
I always want to try a rag quilt with beautiful fabric so I got more and made this quilt:
My idea was to make it seem like midday to twilight where the colors gradually get darker until the big panel with children catching lightning bugs. (You can't see them in this picture but I sewed lines from the ragged seams all the way down and a line across the panel lengthwise.)
My plan is to make one more quilt with this fabric, a smooth quilt with small squares.
Friday, July 25, 2014
Handkerchief Challenges
Lately I've had some creative challenges with my hanky quilts and pillows. The previous post talked about my challenge using round hankies. This time I had some lovely hankies that had one embroidered corner. I wanted to sew it my way which is, of course, rag quilted, but if I did it the usual way the cut seams would have cut through the lacy embroidery. So here's how I handled it.
I centered the designs on a piece of flannel and sewed them down then ragged only the edges of the pillow. I think it turned out great.
Another challenge I had was what to do with all white hankies in a quilt. I always use white flannel when making my hanky quilts. I tried to use different colors of flannel but that changed the color of the hankies and didn't look very good. So when a lady asked me to make a quilt out of her (almost) all white hankies I handled it in two ways.
This is a good technique to use when you have very large hankies with a large amount of white space in the middle and very small hankies. I would sew the small hanky centered right in the middle of the large like this:
I centered each white hanky on an exact size piece of white flannel (so the design of this fabric wouldn't show through) and then sewed it onto the calico fabric.
Then I rag quilted it in the same way as always. Here's how it turned out:
It's really hard to see the beauty of these hankies in this picture but you can see how each hanky is framed by the fabric.
I centered the designs on a piece of flannel and sewed them down then ragged only the edges of the pillow. I think it turned out great.
Another challenge I had was what to do with all white hankies in a quilt. I always use white flannel when making my hanky quilts. I tried to use different colors of flannel but that changed the color of the hankies and didn't look very good. So when a lady asked me to make a quilt out of her (almost) all white hankies I handled it in two ways.
- The first was to layer the hankies.
This is a good technique to use when you have very large hankies with a large amount of white space in the middle and very small hankies. I would sew the small hanky centered right in the middle of the large like this:
- The second was to frame each hanky with a colored print.
I centered each white hanky on an exact size piece of white flannel (so the design of this fabric wouldn't show through) and then sewed it onto the calico fabric.
Then I rag quilted it in the same way as always. Here's how it turned out:
It's really hard to see the beauty of these hankies in this picture but you can see how each hanky is framed by the fabric.
Friday, July 4, 2014
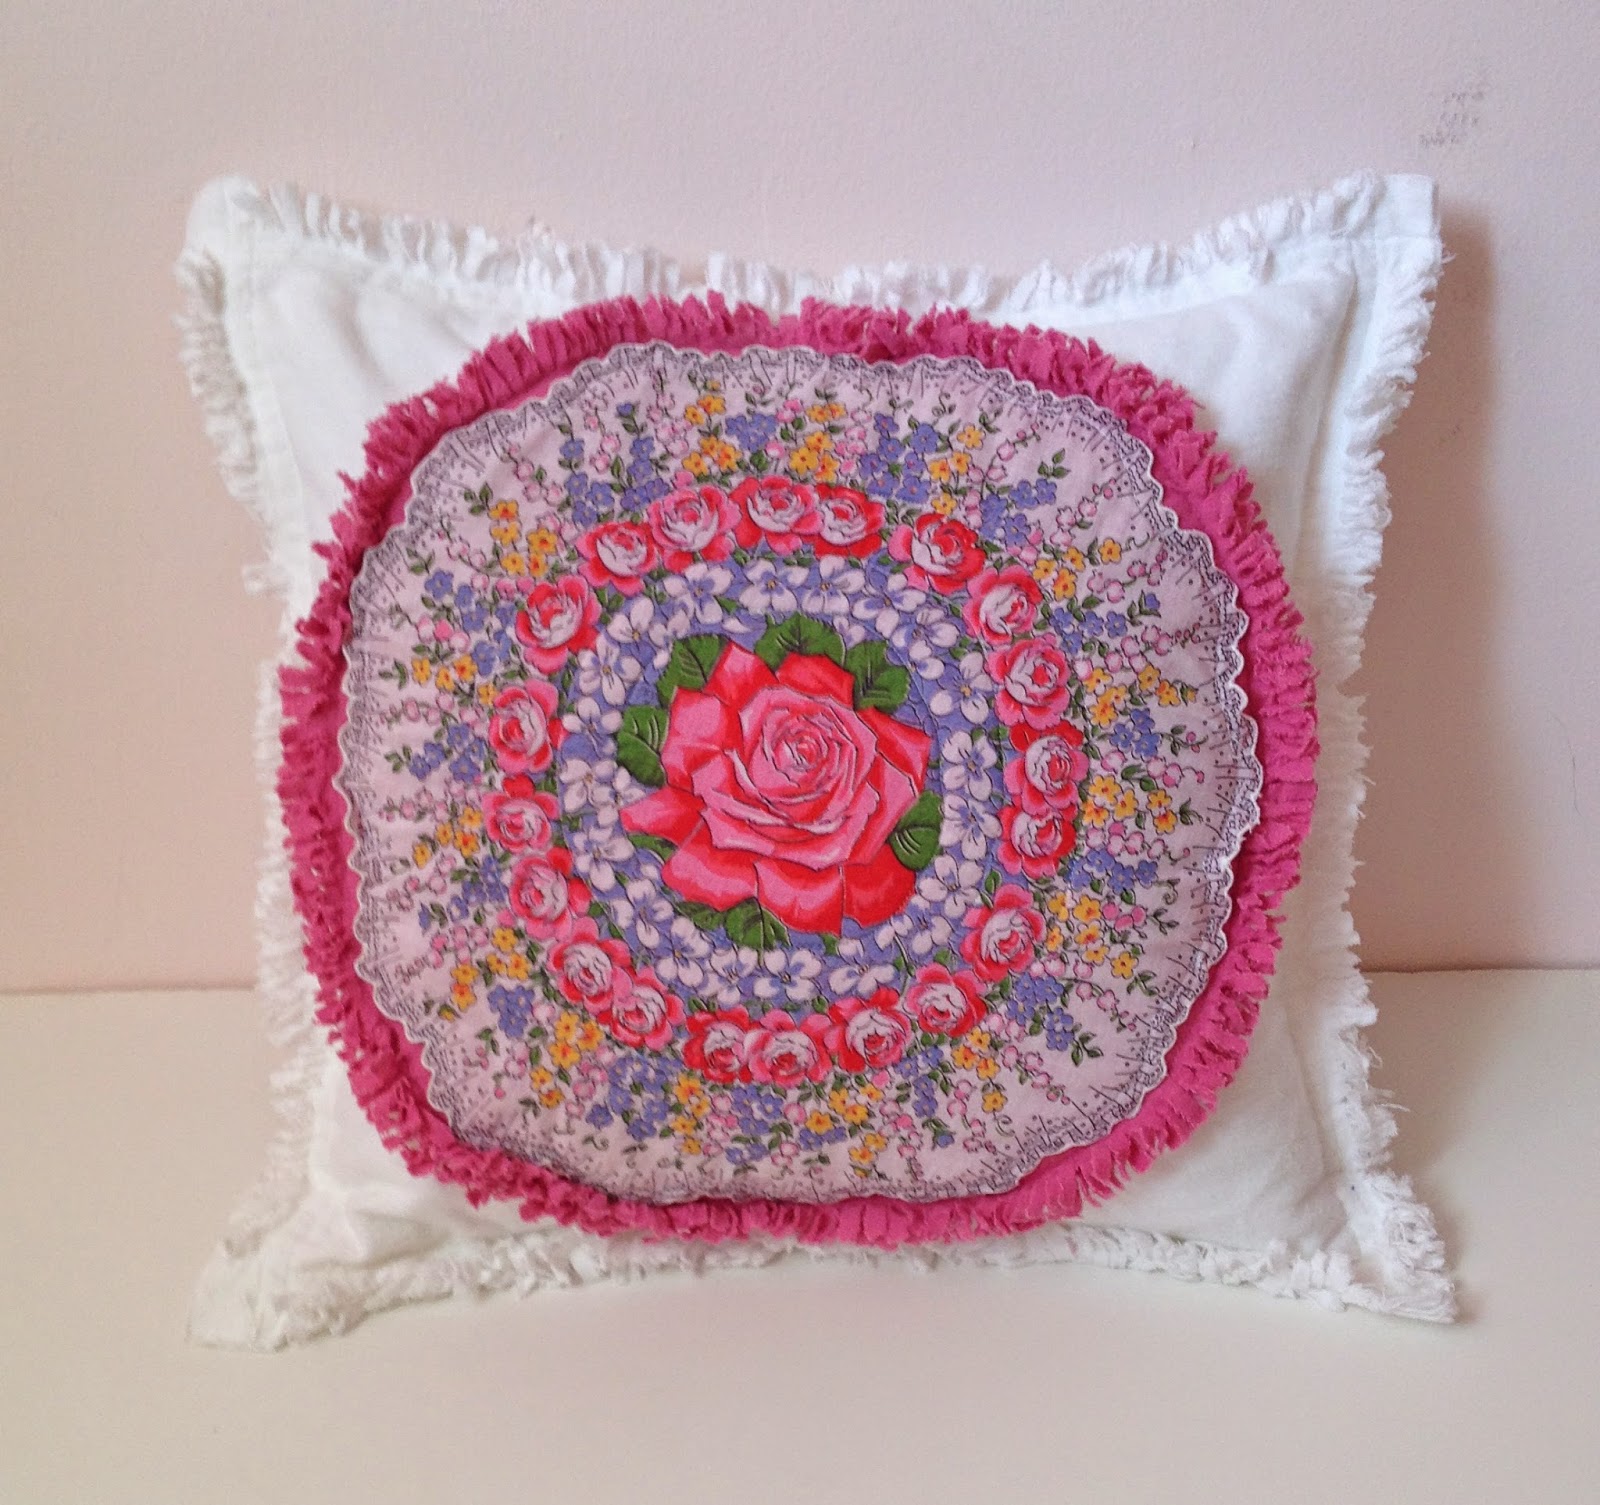
What to do with a Round Hanky
A lady gave me a whole bunch of hankies and she said I want you to make me pillows with these. I had made hanky pillows before. I would rag quilt ('cause that's what I do) 4 hankies together and voila -- a hanky pillow.
Once I had a beautiful pink hanky that I just couldn't use in a hanky quilt so I sewed a pillow cover with just that one hanky in the rag quilt style.
So I knew what to do to make her the pillow covers. However, in this bunch of hankies there were two very pretty round hankies that I just didn't know quite what to do with. I looked up making pillow covers for round pillows and while there were tutorials for them, I didn't think it would work very well for hankies. Then as I was ironing all the hankies to see which would be the best to use for the pillows I noticed some plain jane lace embroidered edge white hankies. Nothing fancy, a little boring. The kind I usually pass over when picking the perfect hankies. This time though I wondered if I could use plain jane with the beautiful round hanky.
I sewed the plain jane onto a piece of white flannel then I sewed the round hanky on top. I added another square of flannel beneath and quilted the two layers together in circles following the design that was on the round hanky. I sewed the two backing pieces on and clipped the edges all around.
This is what I did with a round hanky:
Here is the second pillow. I didn't have another plain jane hanky that was big enough so I backed this round hanky with more flannel.
Once I had a beautiful pink hanky that I just couldn't use in a hanky quilt so I sewed a pillow cover with just that one hanky in the rag quilt style.
So I knew what to do to make her the pillow covers. However, in this bunch of hankies there were two very pretty round hankies that I just didn't know quite what to do with. I looked up making pillow covers for round pillows and while there were tutorials for them, I didn't think it would work very well for hankies. Then as I was ironing all the hankies to see which would be the best to use for the pillows I noticed some plain jane lace embroidered edge white hankies. Nothing fancy, a little boring. The kind I usually pass over when picking the perfect hankies. This time though I wondered if I could use plain jane with the beautiful round hanky.
I sewed the plain jane onto a piece of white flannel then I sewed the round hanky on top. I added another square of flannel beneath and quilted the two layers together in circles following the design that was on the round hanky. I sewed the two backing pieces on and clipped the edges all around.
This is what I did with a round hanky:
Here is the second pillow. I didn't have another plain jane hanky that was big enough so I backed this round hanky with more flannel.
Monday, June 9, 2014
The Good News and the Bad News of Hanky Quilts
I have some good news and some bad news.
The good news is that I get to use vintage hankies in some of my hanky rag quilts. The bad news is using vintage hankies in some of my hanky quilts. I experienced the bad news first hand this weekend when finishing a lovely lavender vintage hanky quilt.
I always check the hankies for weak areas or holes and I don't use those since I know they won't stand up to the washings but in this quilt I thought I had chosen the right hankies. It wasn't until I took it from the dryer that I saw the tears.
I wasn't sure what to do. Could I simply hand sew the tears with thread? No, that would have made it look bad and and it still would be weak all around the mend.
I thought maybe I could remove the whole square but once you wash the quilt it is VERY hard to take a square out and then put it back in. It looks terrible. The nice way the fluff looks after being washed and dried will be affected if you take a square out and try to put it back in. I may have tried it if the square was on the edge but this square was surrounded by other hankies so that wasn't an option.
The only thing left to do was to remove the hanky and put a new one in it's place. Luckily this hanky had a lace edge so removing it wasn't that hard. I had to remove all the stitches in the X first and then cut the lace. I was lucky that I had a few extra hankies to choose from for the replacement. The one I chose was much larger than the square so I had cut it and make a new size.
I never cut hankies! I always leave them the original size. When snipping the seams on vintage hanky quilts, I try to cut as minimally as possible, if at all, into the hanky. This was hard for me to cut up a beautiful hanky but that's what I did. I cut two of the sides of the hanky then sewed a very small hem edge. Then I hand sewed the hanky in place with a blind stitch. The end result turned out well enough for me to be happy.
Here is the hanky quilt after I fixed the torn square. Can you tell which square I fixed?
Update 2/2/19
I made another hanky quilt recently and while I fixed all the small holes before quilting, I found several more after washing and drying...Again! I was heartbroken!!! That is a hazard when making these delicate creations. This time my only recourse was to take the whole square out and replace it with a brand new hanky square. I had to recut the new seams but I am happy to report, you could barely tell which square I fixed.
The good news is that I get to use vintage hankies in some of my hanky rag quilts. The bad news is using vintage hankies in some of my hanky quilts. I experienced the bad news first hand this weekend when finishing a lovely lavender vintage hanky quilt.
I always check the hankies for weak areas or holes and I don't use those since I know they won't stand up to the washings but in this quilt I thought I had chosen the right hankies. It wasn't until I took it from the dryer that I saw the tears.
I wasn't sure what to do. Could I simply hand sew the tears with thread? No, that would have made it look bad and and it still would be weak all around the mend.
I thought maybe I could remove the whole square but once you wash the quilt it is VERY hard to take a square out and then put it back in. It looks terrible. The nice way the fluff looks after being washed and dried will be affected if you take a square out and try to put it back in. I may have tried it if the square was on the edge but this square was surrounded by other hankies so that wasn't an option.
The only thing left to do was to remove the hanky and put a new one in it's place. Luckily this hanky had a lace edge so removing it wasn't that hard. I had to remove all the stitches in the X first and then cut the lace. I was lucky that I had a few extra hankies to choose from for the replacement. The one I chose was much larger than the square so I had cut it and make a new size.
I never cut hankies! I always leave them the original size. When snipping the seams on vintage hanky quilts, I try to cut as minimally as possible, if at all, into the hanky. This was hard for me to cut up a beautiful hanky but that's what I did. I cut two of the sides of the hanky then sewed a very small hem edge. Then I hand sewed the hanky in place with a blind stitch. The end result turned out well enough for me to be happy.
Here is the hanky quilt after I fixed the torn square. Can you tell which square I fixed?
Update 2/2/19
I made another hanky quilt recently and while I fixed all the small holes before quilting, I found several more after washing and drying...Again! I was heartbroken!!! That is a hazard when making these delicate creations. This time my only recourse was to take the whole square out and replace it with a brand new hanky square. I had to recut the new seams but I am happy to report, you could barely tell which square I fixed.
Wednesday, June 4, 2014
Finishes
I haven't written a single post here since April 20th. The (obvious) reason is I have been so busy sewing. I had more that 20 custom quilt orders and I'm almost done with those. (I think I have 7 left to do.) If you are interested, here's some pictures of the things I've finished:
![]() | ||||||||
| Baby Rag |
![]() | |||||
| Soft Quilted Letters |
| Full Size Hanky Quilt |
![]() |
| Front Robot Quilt |
![]() | |||
| Back Robot Quilt |
| Throw size Rag Quilt |
| Hanky Rag Quilt |
| 16 shirt T-shirt Quilt |
| King Size Rag Quilt |
![]() | ||
| 30 shirt T-shirt Quilt |
![]() |
| Texas Star Rag Quilt |
Sunday, April 20, 2014
Spring Break 2014
I have been so sew busy trying to keep up with my custom quilt orders that I haven't written a blog post since the very beginning of March. So I thought I'd share all the things I've made this past week.
Good Spring Break! Happy Easter!!
| 25 Hanky Rag Quilt |
![]() | |
| Vintage/New Bandana Picnic quilt |
![]() |
| Hanky Pillow cover |
| Anna Maria Horner Fabrics Rag Quilt |
| 16 square T-shirt Quilt |
| Full size 42 Hanky Rag Quilt |
Good Spring Break! Happy Easter!!
Subscribe to:
Posts (Atom)